
I received my Particle Photon a few weeks ago so I thought I’d write about how I got started with it.
I think what shocked me in the first place is how small it actually is.
-1-500x500.jpg)
I am used to using the Arduino Uno so when you compare both boards, there is quite a difference of size.
The first thing to do is to check the Particle documentation.
It’s pretty detailed and straight forward which is good and you can get an LED blinking in just a few minutes!
I started by downloading the Particle app for my iPhone and tried to make the built-in LED blink to just check that I was connected properly.
Both your phone and your Photon need to be on the same network to communicate together.
If you don’t want to use your phone and want to use the Particle CLI, you basically just need to install Node.JS and run
1
npm install -g particle-cli
Once you’re done with that, run
1
particle setup
and enter your network details, so the name of your wifi network and your password.
The Photon has an LED in the middle of the board representing the different modes. If it’s blinking green, it is looking for a network to connect to. If it’s slowly blinking blue, you’re connected.
If for some reason it’s not working, feel free to check the documentation explaining the different modes.
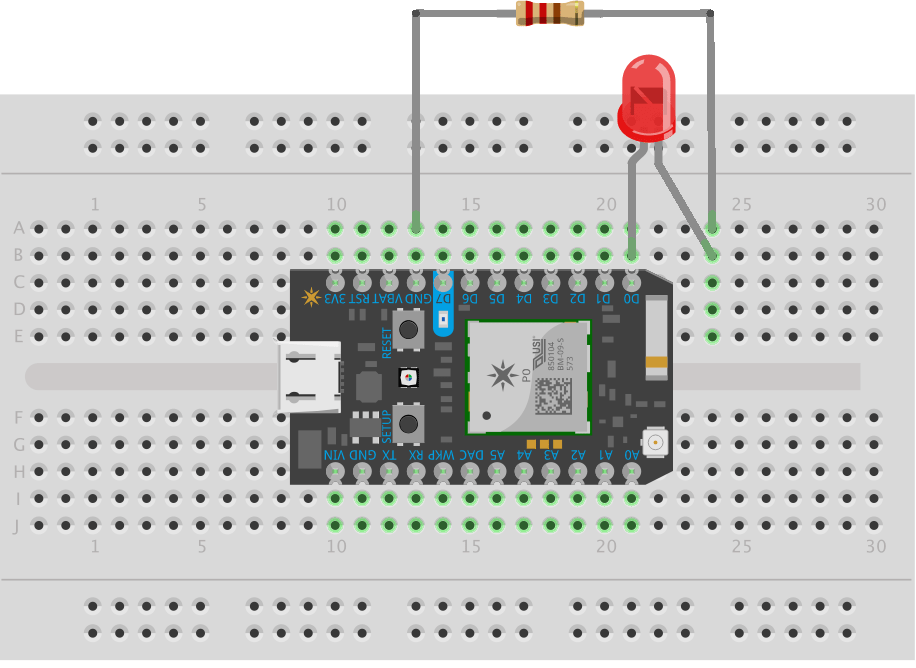
If you want to try a simple LED blink program, start by wiring your circuit this way:
Then, visit the Particle Web IDE and create an account.
Once you’re logged in, you can see a first example app called “Blink an LED”. This example program does not actually allow you to control your Photon via the Internet, it simply uploads it to the board when it is connected via USB to your computer.
To start doing some IoT, you can check the second example called “Web-connected LED”.
The code looks like this:
1
2
3
4
5
6
7
8
9
10
11
12
13
14
15
16
17
18
19
20
21
22
23
24
25
26
27
28
29  int led1 = D0;

  void setup()
  {
     pinMode(led1, OUTPUT);

     Spark.function("led",ledToggle);

     digitalWrite(led1, LOW);
  }

  void loop()
  {
  }

  int ledToggle(String command) {

      if (command=="on") {
          digitalWrite(led1,HIGH);
          return 1;
      }
      else if (command=="off") {
          digitalWrite(led1,LOW);
          return 0;
      }
      else {
          return -1;
      }
  }
I actually had some issues making it work and I had to modify the code a little bit to get it to work. I just removed this line:
1
digitalWrite(led1, LOW);
I’m not exactly sure why this fixed it but it worked.
The rest of the code is fine, we indicate which pin our LED is connected to. We specify that we want to output something to it and we register a function called “led”.
The rest of the code needs to be in the ledToggle() function rather than the normal loop() function. The ledToggle() function receives a command string as an argument that determines the state of the LED;
So this is the program that you need to flash to your Photon but that’s not it, you also need to create a basic index.html file for your web page.
Copy and paste the following code in an html file:
1
2
3
4
5
6
7
8
9
10
11
12
13
14
15
16
17
18
19
20  <!DOCTYPE>
  <html>
    <body>
    <center>
    <br>
    <br>
    <br>
    <form action="https://api.particle.io/v1/devices/your-device-ID-goes-here/led?access_token=your-access-token-goes-here" method="POST">
      Tell your device what to do!<br>
      <br>
      <input type="radio" name="args" value="on">Turn the LED on.
      <br>
      <input type="radio" name="args" value="off">Turn the LED off.
      <br>
      <br>
      <input type="submit" value="Do it!">
    </form>
    </center>
    </body>
  </html>
Make sure you replace your-device-ID-goes-here with your real device ID that you can get by running the following in your terminal:
1
particle list
You should see a list with the name(s) of the device(s) you own and their id.
Also replace the access token that you can find in the Particle Web IDE, by clicking on the settings icon at the bottom left.
Once this is done, you should be able to simply open your index.html file in your browser, click on the button to turn the LED on and see it working! :)
If you get a message like this:
1
2
3
4  {
    "ok": false,
    "error": "Function led not found"
  }
The usual errors you probably made can be:
- Either you need to check that the name of your function is the same in the code you flash to the Photon and the url you make the post request with in your html code.
- Or you didn’t flash the code properly on your Photon so there are no “led” function registered.
If you decide to start tinkering with more than an LED and writing your own functions, you can make sure your code has been flashed properly by running ‘particle list’ again in your console and check that your function(s) appear.
That’s it! That’s the basics to get started doing some IoT with the Photon! :)
If you want to find some ideas of projects to build with the Photon, go check out the Hackster.io page